Once upon a time, I used flannel backed tablecloth for my design wall-it originally lay on the bed because my sewing room was a spare room without a spare wall! So I laid things on the tablecloth on the bed so I could roll it up when I was done for the day.
When I moved into my super duper Studio, I used the table cloth stapled to the wall.
It worked well until I needed more design than the 40 x 60 tablecloth.
I bought cotton batting and stapled that to the wall! It has been a wonderful upgrade until the batting sagged and it looked like swags and what was I thinking putting it all the way up to the ceiling?! The top two feet of the 9 foot wall were just a waste!
Now my neighbor, Millie, and I have been working on this new design wall idea.
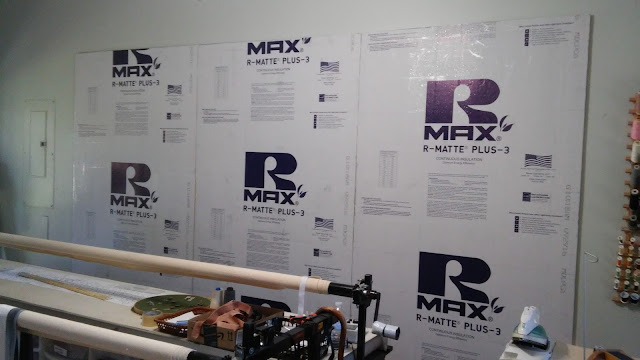
We have used Liquid Nails to 'glue' the heavy duty foam (not the beaded white stuff!)
to the wall and then we will cover it with the batting and tuck it in around the edges so it will be very neat and professional looking!
We each had one outlet to work around but have both glued our sheets of this stuff to the wall and let it dry! The board at the bottom is so that I could keep the sheets level for placement.
We don't have baseboards yet so this will allow room for them.....someday.
Tomorrow we use adhesive spray to attach the batting to Millie's wall and Friday it will be my turn!
Tomorrow we use adhesive spray to attach the batting to Millie's wall and Friday it will be my turn!
(I ended up cutting one foot from the 8 foot length of these so that I could leave room at the top to bring back my shelf and also hand a 12' pvc pipe across the bottom hardware for displaying the quilts for photos!)
All in good time!
Lena was a great help during this 4 hour process today-she keep the batting still for me so I could walk around it all the way!
By afternoon, I was ready for some recliner therapy and finally finished my second pair of socks for the year!
This is Stroll fingering in Gumball on size 2.5mm.
I like the look of the leg in that k3, p1 rib and especially the fit-it really hugs unlike plain stockinette all the way to the top cuff some patterns use.
And there is no need for additional rib at the top.
And because the evening was young, I cast a new sock as soon as that last tail end was woven in!


That's a clever idea for your wall. It was nice of kitty to help.
ReplyDeleteLove, love, love those socks!
Great idea for your wall! I've been eyeing that gumball color from KnitPicks - love it. Your next pair will be equally colorful and pretty!!
ReplyDeleteI think it's a law .............if you bind off, you must cast on! So glad you did. BOTH socks are great colors! The new one looks like it will be fun to knit.
ReplyDeleteCongrats on the wall .................Lena takes her part in it VERY seriously!
The new design wall is exciting! Socks are pretty...and Lena is as adorable as ever...
ReplyDeleteI LOVE your socks. Love love love them. I finished my second pair of 2017 yesterday too. I took a picture of them in the snow and they don't look as perfect as yours on the blockers!!!! Love your new start too! Zig zag is new to me, How do you like it?
ReplyDeleteThose socks are AWESOME!! (And now you've made me jealous... as I would LOVE a Design Wall in my quilting studio.)
ReplyDeleteSorry, but my email won't let me connect to your email! Argh! Technology! The magazine you asked about with the boots pattern in it is Fons & Porter's easy quilts Spring 2017 issue. Run out and get it now!!!
ReplyDelete